
Hello!! It is moi.
I am so happy; I now have 12 faithful followers. It makes my day each time that number goes up!
So to all of you:
 !!
!!
Anyway, today I am going to show how to make gorgeous, little fabric rosettes.
Like this one.
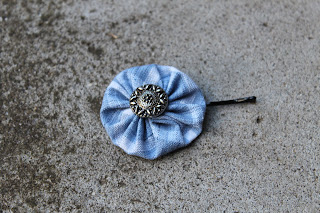
They can be used in so many ways:
-on a hair elastic
-on a bobby pin
(like that one up there)
-on a brooch pin
-on cards and for scrapbooking
-decorate the corners of your
tv or computer (if you have a fat
desktop one like me)
-sew them onto your clothes/hats
-make tiny ones for earrings
-on a dog's collar (so cute!)
and the list goes on and on.
They are so quick and easy to make, and you can use whatever fabric and buttons you want, to match any genre of dress. Every girl should like them.
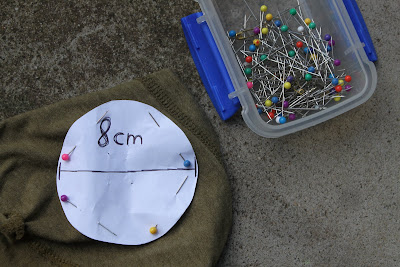
For this size (ends up 4cm across), you need an 8cm in diameter
paper template, which you can use over and over again.

~2~
Cut out the circle. Sew a running stitch about 4 millimetres away from the edge. I started doing each stitch individually, but then my sister pointed out a quicker way to do it. You put lots of stitches onto the needle, and THEN pull the needle through. Like this:


So to all of you:
!!Anyway, today I am going to show how to make gorgeous, little fabric rosettes.
Like this one.

They can be used in so many ways:
-on a hair elastic
-on a bobby pin
(like that one up there)
-on a brooch pin
-on cards and for scrapbooking
-decorate the corners of your
tv or computer (if you have a fat
desktop one like me)
-sew them onto your clothes/hats
-make tiny ones for earrings
-on a dog's collar (so cute!)
and the list goes on and on.
They are so quick and easy to make, and you can use whatever fabric and buttons you want, to match any genre of dress. Every girl should like them.
For this size (ends up 4cm across), you need an 8cm in diameter
paper template, which you can use over and over again.

~1~
Pin the template to your desired fabric. I used an old top.

~2~
Cut out the circle. Sew a running stitch about 4 millimetres away from the edge. I started doing each stitch individually, but then my sister pointed out a quicker way to do it. You put lots of stitches onto the needle, and THEN pull the needle through. Like this:

Make sure it goes into a little bag shape; to help, you can stick your finger inside it.
Here's what it should look like once you've sewn all around.

~3~
Flatten out the 'bag', keeping the thread tight.
(The tan spots on my hand are the remains of a henna tattoo)

~4~
Next comes the tedious task of choosing a button. This part always takes me the longest, haha.

~5~
At the same time as sewing your button on, sew it onto your chosen item if possible.

~6~
Admire and wear.


Let me know if you make any, and send me a link to your photo!
Enjoy!
Hello! I just discovered your blog, really adorable! I'll have to make some of those!
ReplyDelete